Showing posts with label Tutorial. Show all posts

Tuesday, October 30, 2012

How to wrap a multi-hole stone.

Below is the tutorial on how to wrap a multi-hole stone


Materials you need:

  1. A Theme stone: The black stone used is quite thin. Do not choose a thick one.
  2. 22 gauge copper wire about 20 cm
  3. some beads for decoration

Tools you need:

  1. A Driller
  2. Cutter
  3. Flat-nose pliers


 Steps:

  1. Choose your theme stone. Do not pick a very heavy stone. It would be too heavy for you to wear after adding the weight of beads.
  2. Drill holes about 1 mm wide, spacing about 5 mm. Adjust the spacing by the sizes of your beads.
  3. Drill a bigger hole at the top.
  4. Thread the wire into the middle hole.
  5. Thread one bead and pull the wire going through the next hole from the other side.
  6. Repeat step 5 for each hole.
  7. Coil and cut excess wire.


Tuesday, August 7, 2012

DIY - Wires container

A craftsman has various items to play with. In other words, a craftsman has to organize so many items. The better a craftsman organizes his work place, the more efficiency he has.


Materials:  Water bottles.
Tool: A sharp knife.

The usages and benefits of the DIY wires container:

  1. Free: It costs almost nothing but a little time and effort to cut the water bottle. The cutting tip is to use a sharp knife to cut the bottle vertically. 
  2. Transparent: It's transparent so that I can see if there are wires suitable for what I'm working on. This will save time and efforts.
  3. Organizer: All I have to do is throwing pieces of wire into the container. Use several containers to store wires with different sizes , materials, lengths. 
  4. Tips collector: Dealing with ends of wire is a must thing that should not be avoided. The most part is cutting the ends to make sure that the ends are flat. Thus, we keep producing little tips. When cutting the wire tips, hover hands over the container so that the wire tips will fall into the bottom of the container. All you have to do is pouring little tips out of the container every several months. 
By the way, put the container in a cabinet with doors to prevent collecting dust over time. This will save you from taking time to clean it.

Thursday, July 26, 2012

Free little wire earrings tutorial

This is a free little earrings tutorial. You can choose whatever color of beads and wires to make your own earrings by the same method.


The wire is very thin, and may be destroyed by force. Things that can be made can be destroyed as well. If you wear the earrings carefully, it can last for some time. Even if the shape does not hold, you can still reuse the beads for other jewelry.

The dried flower was pressed about 5 years ago. It still keeps its shape, not bad. Time teaches us what's the quality. I put it in the photos as a background decoration.

Materials of the little earring tutorials
1. 28 gauge * 8 cm *2
2. 4 mm beads 5 pcs *2

Tools needed:
1. round nose pliers
2. flat nose pliers

Making time: about 10 minutes

Step 1
String 5 beads on one piece of wire.

Step 2
String the last bead crossly.

Step 3
Use round nose pliers to form a loop.

Step 4
The end of wire goes through the last bead again.
Note: Flat nose pliers can help to pull the wire.

Step 5
Coil the wire closely to the last bead at both sides. The small and big loops are fixed in this step. Cut the excess and use flat nose pliers to flat the ends.
Note: Make sure the size are similar before coiling.

Step 6
Done!

Wednesday, July 25, 2012

Turning the broken ear hook into a finding

Do not just throw your broken jewelry parts away. If you have the sense of "Do it yourself.", you can turn broken objects into useful objects easily.

Even you do not have ideas what to do with broken parts. If the jewelry are made of precious metal, you can sell them to precious metal merchants at good price by collecting them.

The ear hook is broken. Use round nose pliers to round the wire, and get a jump ring.

The broken ear hook


Saturday, July 7, 2012

The freestyle wiring pendant

One single-color wiring object can be added any little element to have a various feel.

The leftover wire does not have to be a waste.


This is a freestyle pendant from some wire-work leftover made before. Here is a good example that leftover materials have its way to become a great craft.

Let things to sit for some time and ideas will hit you at any time.


1. The best part of freestyle is free. The rule is free, not limit.

2. Turn any one loop and thread the chain. It has a feel of bonsai.

 3. Does crystal beads match this freestyle pendant?

 4. What about colorful beads? If you like it, just to wrap beads on.


5. What about similar color beads? By the way, big photos are great.

Wednesday, June 13, 2012

4 Wire Flower Projects

My new ebook: 4 Wire Flower Projects is published today.

In this ebook, there are step by step tutorials and clear photos.


The 4 types of wire flowers are:

  • Flower Bud
  • Wheel Flower
  • Sunflower
  • Petal Flower
Each of them include different wire jewelry techniques. 
Now, it's only 2.99.

You have two options

Sunday, June 3, 2012

The thick wire mandrel

Mandrels are playing an important role in wire-work making, such as loops making.
Mandrels help to make demanded shapes beautifully. An appropriate mandrel helps much.

There are also mandrel tools sold in the market.

In household, you can find many items to serve as a mandrel. The pen and the pencil are of the most popular items and I use them often.

Another good mandrel idea is using the thick wire.

Wires are produced by different gauges.

Thick ones can serve as mandrels as well.

Put it simply, the wire itself is not only one kind of materials but also is a good tool.

3 mm thick wire mandrel
In conclusion,Wires can be great mandrels.

Sunday, March 11, 2012

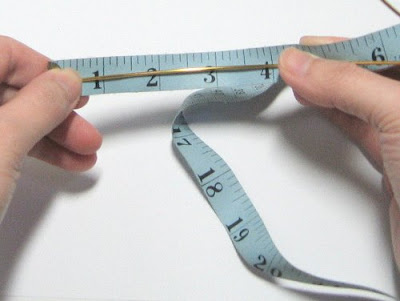
How to measure the length of wire?

Usually, it is not necessary to know the exact length of the while making.

When you want to know the length so that you will make your wireworking easier or not to waste your materials, you had better measure its length.

Because the materials we work on are not straight, we need to count the length of curve.

The ways to measure the length of wires:

  • Use a cloth measurer
  • Use mathematical formula: Circumference = diameter *  Ï€ (3.14)
How to measure the length of wire

The mathematical circumference formula
The thumb rule:
A little bit "longer" is usually better than a little bit "shorter".

Tuesday, March 6, 2012

Danish Knot one more step

Danish Knot is a combination of 3 pieces of wire coils.
How about going one more further by using 4 pieces of coils?
What would this looks like?
It's a variant of Danish Knot.
The fourth coils is not easy to join. But if you keep the wire coils a little looser, it works.

4 coils of danish knot

a variant of Danish Knot

Still have room to open

Sunday, March 4, 2012

Wire head pin tutorials

The video below shows making 2 types of head pins

  • The first type head pin: Just bend the wire at 90 degrees.
  • The second type head pin: make a small U-shape or loop, and squeeze it with your flat nose pliers. Then bend the squeezed part at  90 degrees. You can also skip the squeezing step. After you make a small U-shape or loop, just bend it.


Thursday, February 2, 2012

Simple beaded wire tutorial

This is my new tutorial.


4mm Swarovski bicone beads are used in video.
Round beads and other kinds of beads are all fine.

Friday, September 2, 2011

DIY: Nylon Jaws Pliers

Nylon Jaws pliers can be used to straighten wires and to bend wires without leaving tool marks.

Using nylon jaws pliers to straighten wires is one of the methods to have straight wires. It's not the best method but convenient. Nylon jaws plays an important role in lessening tool marks while making wire jewelry and wire craft.

To buy nylon jaws and the replacement can cost some money, DIY nylon jaws can save money and have some fun.

Making your own cheap Nylon Jaws pliers:


Tools you need:

  1. a chain pliers or flat-nose pliers: You can make use of old pliers to save money.
  2. a plastic cover of cans: Here is the cover of a milk powder can; the plastic materials used here is called LDPE. You can easily find the same materials from grocery items.
  3. scissors
  4. glue
Nylon Jaws tools
Making nylon jaws steps:


Step 1    Cut the plastic cover into the shapes of the pliers.
Cut the plastic cover into shapes for pliers
Step 2 Glue the plastic pieces onto the pliers
Glue the pieces
The tips are a bit open 
            The tips of the pliers are a bit open, yet it doesn't matter. When the glue is dried, it's done! You can use an art knife to trim the edges.

You can cut as many as plastic pieces for future replacement in advance. The best part is that the replacement is totally free.

Does this DIY nylon jaws work?
It's not perfect, but it works.
This DIY nylon jaws can straighten the wires.
When bending the wires, it makes rarely tool marks.

BTW: Make multi-layers nylon jaws for your own purpose.

the experimental wires

wire straightened

Friday, January 21, 2011

How to make jump rings

Jumps rings are basic components for wirework.
As for making chain maille, all you need are jump rings, many jump rings.
You can purchase jump rings from suppliers, however, they are a little bit more expensive.


Jump rings making is a no-brainer.
Making jump rings for your custom purpose costs a lot of time, and this is the worst.
In my opinion, the best time to make jump rings is when watching TV, especially ads times.
After an episode or news program, you will get many jump rings. If you act this way every day, you will never waste time on this time-consuming work. Especially when you are making "mailles". A big maille piece needs thousands of jump rings.

How to make jump rings :

Step 1    Make a long coil as you like.  You need a rod to form the coil.
The rod I used to make the coil is a broken glass coffee stick bought from a craft store.
Step 2    Coil the coil.
The coil is open now.


Step 3    Stretch the coil till the rings as open as good for cutting and passing through. 
Stretch the coil several times with even tension. 
Step 4    Cut jump rings. Remember to flush cut the wire every time you cut a jump ring.


Friday, December 10, 2010

How to choose colors for wirework?

Before making any wirework, I usually try to imagine the final looking.
The looking of different colors of same design will varies. 
There's a easy way to choose the colors, not only by your imagination.
Just put the different colors and different quantity small objects together.
It will show you how  the combination of wire colors will look like, and you can make a better decision.


How to choose a cutter plier?

A cutter plier is one of the most basic tools for wirework making.  The tool you use will play an important role of the quality of your DIY work.
Usually a good cutter plier doesn't cost much. The question is how can we determine a cutter plier is good enough?
All the cutter plier can do the cutting work.  But you will find the difference by taking a close look.
When you buy a cutter plier, do you know what kind of cutter plier will do the perfect work for you?
If you are making delicate wire jewelry, and you care about the cutting quality.
How to choose a cutter plier (cutting plier)?
3 things to consider when you purchase a cutter plier:
  1. Be sharp enough to cut easily: If the cutting plier is not sharp, the cutting edge will be ugly.
  2. The flat sides must be perfect flat: If the flat sides do not match perfectly, it's sure that we will not get perfect cutting. The cutting edge will be effected by the match of the flat sides. Use your finger to touch the cutter and feel the flatness. Another good way to know if it's flat is to use your nail to scrub.

  3. The holding width should be fit for your hand to hold: If a plier too wide for your to hold, you will spend much efforts to hold it in your hand. When you are having much cutting work, you will be suffering.
    The width does matter.